ARB Safari Snorkel Install

ARB Safari Snorkel Install
July 2004
The following images document the installation of the ARB Safari Snorkel on a 2003 Jeep Wrangler Rubicon.
Removed the top of the stock air box by unlatching the clips circled red. Note the drain hole outlined in green. We will plugged that later. Unbolted the three bolts holding the air box to the Jeep. There are nuts on the bottom that will fall, as well as spacers between the fender wall and the air box, shown in the next picture.

We were careful not to drop the red circled spacers in the picture while removing the air box.

With the stock box out, we moved to the battery area. We loosened the battery tie down nuts and then remove the bracket.

This image shows the battery with the battery bracket removed. We then removed the battery cables.

We then removed the battery. Removing the battery exposes the battery tray, which is held on by 4 bolts (circled in red). We removed those bolts and then the battery tray. We were careful not to break the battery sensor (circled in orange).

We unplugged the temperature sensor during the removal of the battery tray. In the below picture, the sensor was plugged into the plug circled in green. The vacuum box may or may not need to be relocated. It is held on by one bolt, noted in red.

We removed the vacuum box so we had more room to work while routing the snorkel tube.

We used painter’s tape to draw on when applying the template to the side of the vehicle. We could have done without tape.

We aligned the template with the top left corner of the fender.

We filled in the holes on the template.

Drill points.

We then used a hole saw to cut the hole. The hole saw has a drill bit in the center, so that's what we aligned on the dot we drew from the template. Once the drill bit was through the fender, the saw portion of the hole saw can make contact with the fender. We switched the drill to reverse and pressed against the fender until bare metal was shown. We then switched the drill to forward and cut the hole.
Not using reverse first makes it difficult to saw to the bare metal of the fender because the teeth of the saw get stuck in the clear coat frequently. So reversing first scrapes all the tape, clear coat, and underlying paint from the fender.

Once the larger hole was cut, we drilled the two remaining holes.

We then removed the tape.

We then applied tape to the top windshield frame. Again, we could have just drawn directly on the paint.

We temporarily put the snorkel on the Jeep (at the bottom) to determine where to drill on the windshield frame. We marked the area.

We drilled the top holes. The two bottom holes exposed plastic, which I believe we ended up drilling through because they were preventing us from installing inserts.

And then we removed the tape.

We painted the exposed metal areas to reduce rusting.

We used a template and drilled the first holes in the air box. This is the stock air box where the intake trumpet is normally located. We removed the trumpet without tools, and then drilled the template holes out.
In other installs, we applied silicon around the trumpet base and left the trumpet installed for better highway airflow. Then the driver uses a pipe plug to seal the trumpet when off-roading to make the system water tight. There are two versions of the ½” plug at Lowes. We use the metal one with the larger wing nut.

We did not use the trumpet in this install, so we continue to plug that area. We started by applying silicon.

We aligned the plate included in the kit and positioned the rivets in place.

We riveted each rivet. We used a start pattern.

The rivets installed.

We then aligned the intake relocation template and marked the holes.

We drilled out the small holes and used a Dremel to cut the larger hole. The larger hole is outlined in red.

We Dremeled the larger hole.

The intake relocation holes completed.

The side of the air box is ribbed and required a lot of silicon to ensure a tight seal. We used much more than what is shown here.

We positioned the relocation bracket and rivets.

We riveted the plate in place using a star pattern.

Finished stock air box.

Back to the windshield, the paint dried and we applied the screw inserts.

Shown from farther away.

We screwed the top windshield bracket frame into the screw inserts.

Installed bracket from farther away.

Unfortunately this Rubicon’s fender support bracket (outlined in red) has a much smaller hole (pointed to by green arrow) than other TJs.

To fit the snorkel intake tube, we were forced to cut out the fender a little. We aimed to mirror a hole outline from a 1997 and 2000 TJ.

We used the hole saw in an angled drill to cut the initial hole. We used a Dremel to cut the sharp points.

We lined the new hole with the supplied grommet.

And then we did the same grommet install on the other fender hole.

Image showing both grommets installed.

Image from outside the Jeep showing the route the intake tube will have to take.

We aligned the snorkel with the side of the Jeep, routed and connected the intake tube, and attached it to the snorkel with the supplied hose clamp. We used silicon where the snorkel and tube meet.

Image showing the hose routed through the fender bracket.

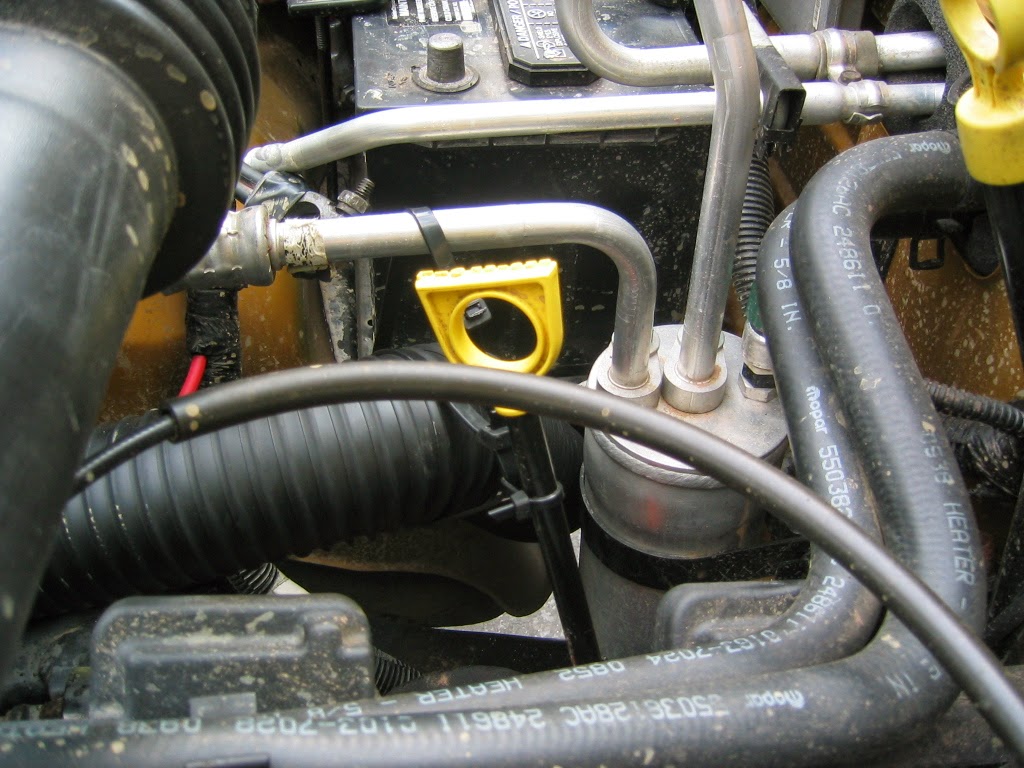
Image from inside the engine compartment showing the house routing.

We jammed the vacuum box in with the tube and screwed it down. I do not recall if we used the original screw point. It's likely that the box sits higher than it previously did.

We then reinstalled the battery tray along with the battery sensor.

The battery was reinstalled.

The battery tie down bracket was installed.

We re-installed the bottom of the air box. We silicon-ed each bolt and plugged the drain hole.

We connected the intake tube to the air box and silicon-ed the connection.

Another image of the connected intake tube.

We attached the supplied zip ties as shown.

Another view of the zip tie location.
We then bolted the snorkel to the top bracket.

The top of the snorkel was then attached.

The owner chose to remove the threads from the door pins so the doors could be removed without unbolting the top of the snorkel.

Another shot of using the Dremel to remove the threaded studs.

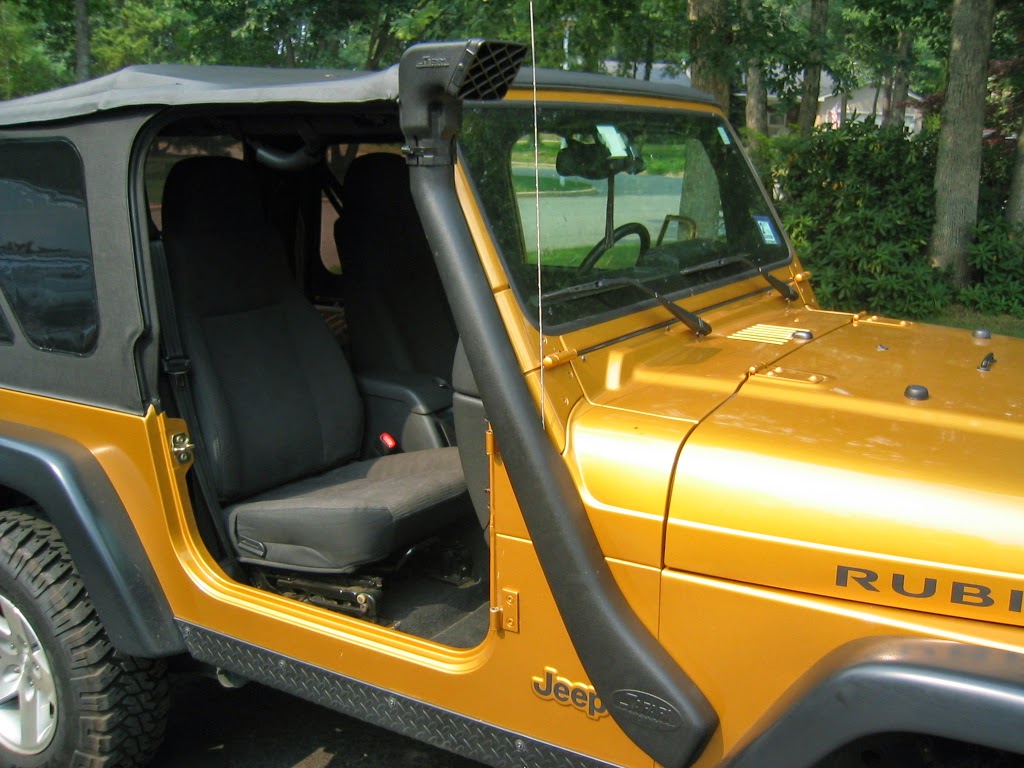
Finished job images.


0 comments: